gitlab, Docker-compose, EC2 version
This is the first in a series of posts offering suggested strategies for leveraging open source technologies to effectively host data science analysis apps and reports online.”

 Photo by Nathan Waters
1 Introduction
This is the second in a series of posts offering suggested strategies for solving one of the central practical challenges in the practice of data science, i.e. how to effectively communicate analysis results to clients and collaborators. The strategies offered in this series of posts are all based on open source tools: e.g. linux, R, Shiny, Docker, Git, and Caddy. In this post we’ll make use of two cloud services: Gitlab and Amazon Web Service (AWS). Further posts will describe alternative cloud services, e.g. the low cost service: Hetzner.
A similarly straightforward strategy, but one that’ a bit simpler avoiding Gitlab and docker is described here (here). This approach provides a simpler initial construction, but a more labor intensive updating process.
This post is a proof-of-concept example applying common open-source technologies with the goal of hosting an interactive Shiny application on a secure dedicated website. We start with a simple, stand-alone Shiny app on our local workstation, and end the process with the app running securely on a dedicated website with a custom domain name.
2 Methods
We’ll start by creating a repository for the project on the version control cloud service Gitlab. We’ll then clone the repo to our local workstation to create a local workspace. More specifically, we’ll log into Gitlab and create a new empty private repo (see detail box below), call it, e.g. power1_app. Then on your local workstation navigate to a development directory, say e.g. ~/prj/shiny, and clone the power1_app repo from Gitlab:
 cd ~/prj/shiny
 git clone https://gitlab.com/rgt47/power1_app.git
After cloning the repo change directories into ~/prj/shiny/power1_app and create two new sub-directories, power1_shiny and site. These directories will house our shiny app and our web site landing page, respectively.
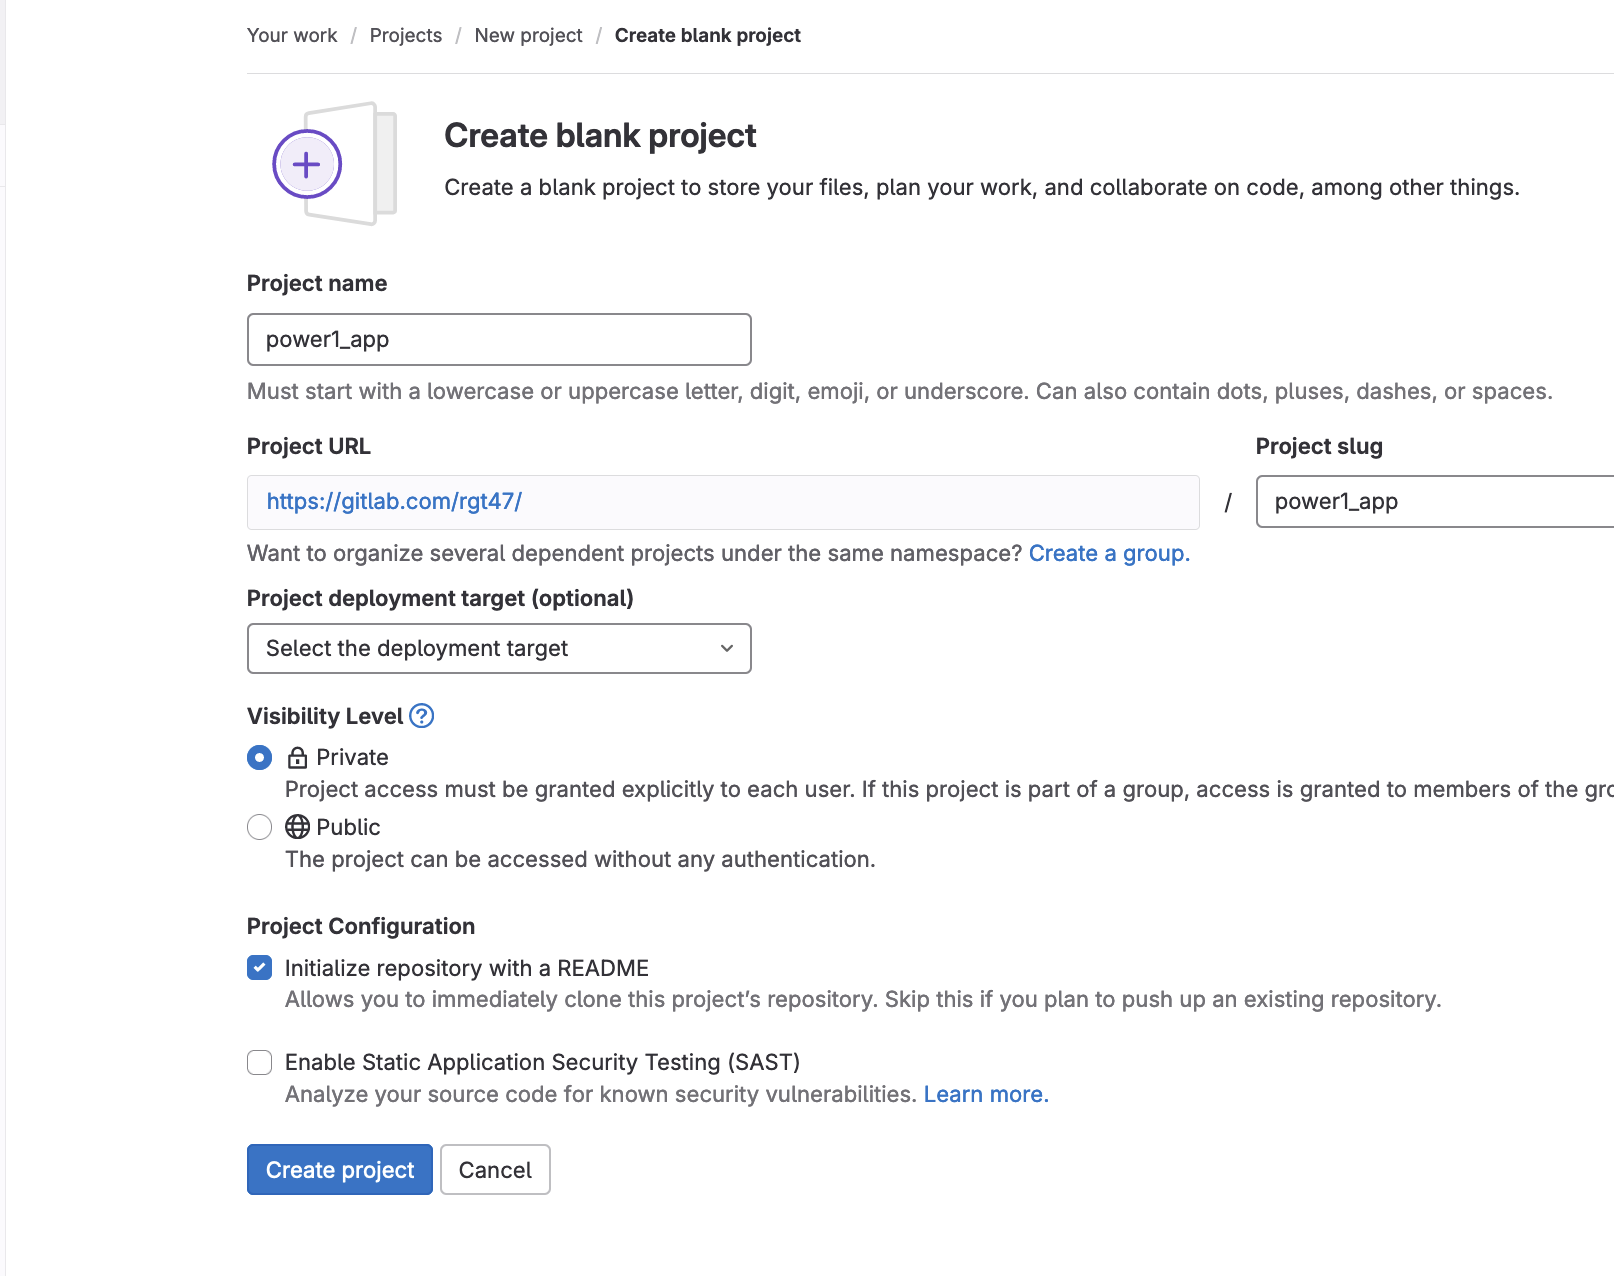
Login to
gitlab(see screenshot in margin)Click on
New project. Inrepository namefield enterpower1_app.Make the repo private.
leave
deployment targetempty.Click
Create project(blue button) at the bottom of the page to create the repo.On your local workstation
cdto development directory, say ~/prj/shiny and clone the gitlab repo:generate
gitlab_access_token.
cd power1_app
mkdir power1_shiny
mkdir site
Now begin Shiny code development in the ~/prj/shiny/power1_app/power1_shiny directory. For this post we’ve written code for a simple Shiny app. See the Shiny code for our example power1_shiny app (app.R) below.
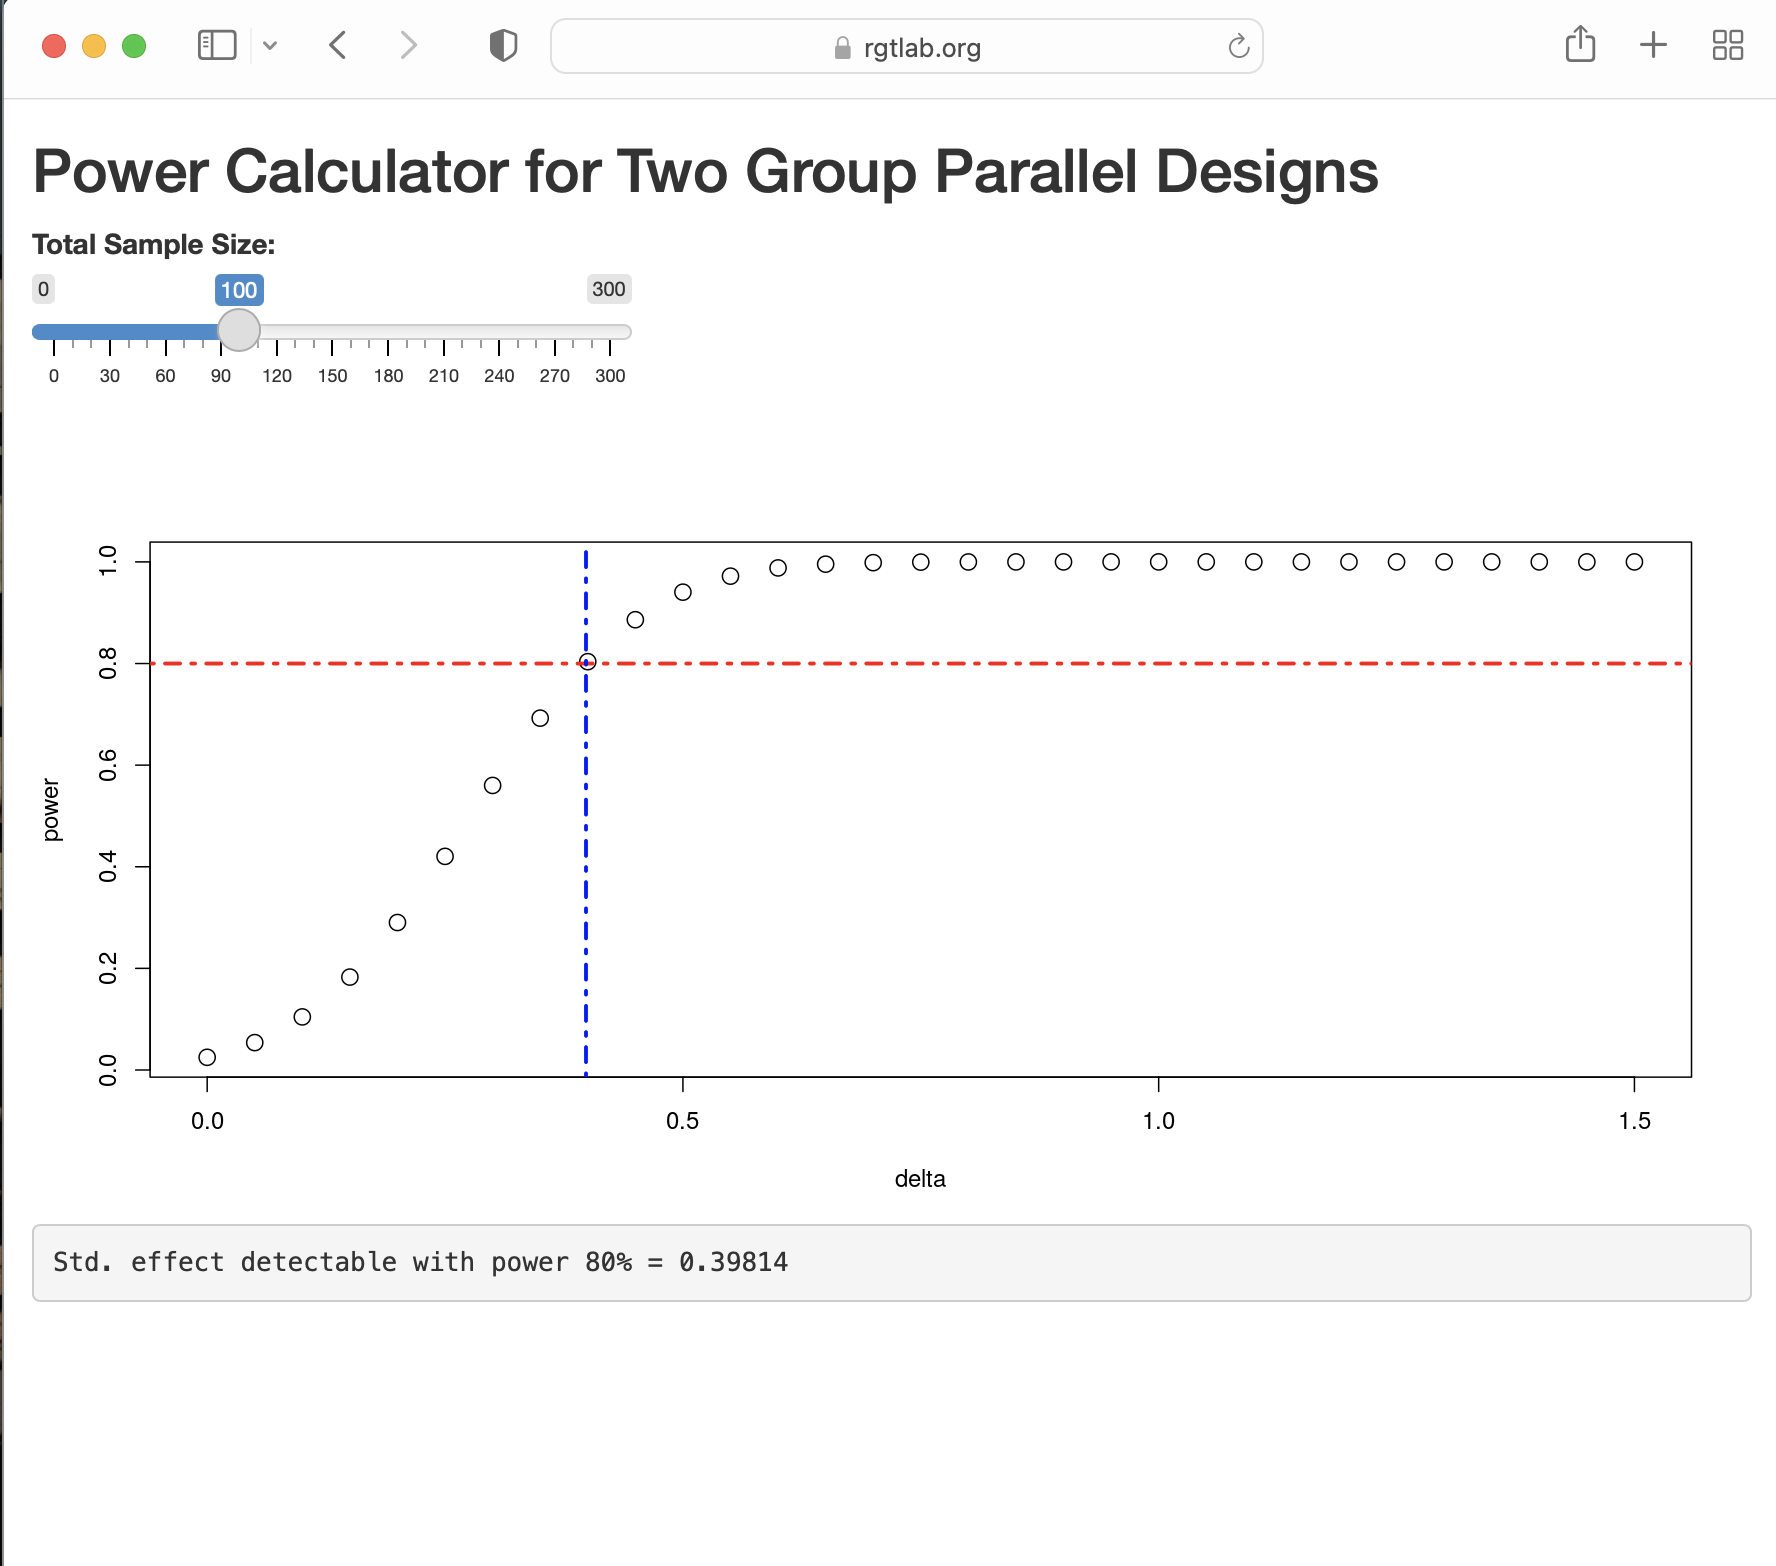
This example is a simple Shiny app that calculates the power for a 2-sample t-test as a function of the standardized effect size. The app is intentionally minimal. Using only base R functions. It has a minimum of reactive widgets and layout commands to keep it simple while still performing a useful function.
Figure 1 shows the Shiny app running locally in a browser, it consists of a widget to select the sample size and provide a dynamic visualization (2D plot) of the statistical power as a function of the standardized effect size:
The code is here:
show the power1_shiny/app.R code
ui <- fluidPage(
titlePanel("Power Calculator for Two Group Parallel Designs"),
sliderInput("N", "Total Sample Size:", min = 0, max = 300, value = 100),
plotOutput("plot"),
verbatimTextOutput("eff"))

server <- function(input, output, session) {
  delta = seq(0, 1.5,.05)
  pow = reactive(sapply(delta, function(x) power.t.test(input$N, d=x)$power ))
  eff =  renderText(power.t.test(input$N, power=.8)$d)
  output$plot <- renderPlot({
  plot(delta, pow(), cex=1.5, ylab="power")
  abline(h = .8,  col = "red", lwd =2.5, lty = 4)
  abline(v = eff(), col = "blue",lwd =2.5, lty = 4)})
  output$eff <- renderText(
    paste0("Std. effect detectable with power 80% = ", eff()) )
}
shinyApp(ui, server)
We can test the app locally in our development directory, power1_app, by runnning the following command.
> R -e "library(shiny); runApp('power1_shiny/app.R', launch=T)"This command will run the R program, load the Shiny package, run the Shiny program to convert the code to HTML, CSS and Javascript and launch the app in our default browser.
After determining the app is working as designed, the next steps are to dockerize the app and set up a secure host on the web, i.e. a server running a web-server supporting encryption and authentication.
“A reverse proxy is a server, app, or cloud service that sits in f”ront of one or more web servers to intercept and inspect incoming client requests before forwarding them to the web server and subsequently returning the server’s response to the client.” reference
2.1 Hosting
How to set up the hosting server? There are many ways to accomplish the hosting. Here we’ll describe a straightforward and efficient approach using mainstream cloud services and open source tools. In other words, we’ll describe how to ‘spin’ up a virtual server on Amazon Web Service EC2, and use Docker, R, Shiny, and Caddy to put in place a secure web app to share with our colleagues.
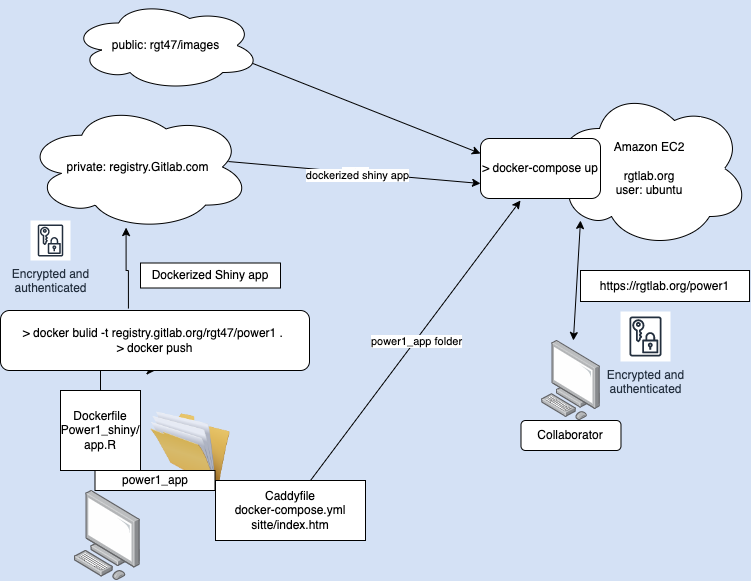
Figure 2 summarizes the flow of program and configuration files. In order to host power1_app online we’ll need to complete the following tasks:
Hosting List
Generate a virtual server with a firewall on EC2.
Obtain a static IPv4 address (to identify the server online)
Obtain a custom domain name (a name to associate with the static IP address) from a domain registration provider. E.g
rgtlab.orgInstall and configure a webserver on the virtual server ( a tool to interact with https protocol requests )
Obtain and install a TLS (transport layer security) security certificate (to allow encrypted communication between the server and other machines on the network).
Configure user authentication for the web site.
configure a reverse proxy method (to translate
https, port 443, requests toShiny, port 3838, requests).
“What Is An SSL/TLS Certificate?
An SSL/TLS certificate is a digital object that allows systems to verify the identity & subsequently establish an encrypted network connection to another system using the Secure Sockets Layer/Transport Layer Security (SSL/TLS) protocol. Certificates are used within a cryptographic system known as a public key infrastructure (PKI). PKI provides a way for one party to establish the identity of another party using certificates if they both trust a third-party - known as a certificate authority. SSL/TLS certificates thus act as digital identity cards to secure network communications, establish the identity of websites over the Internet as well as resources on private networks.”
2.2 Select a hosting service
In this post we’ll describe the process using AWS EC2. Detailed instructions for setting up a server on EC2, both via the console and the command line interface are covered in earlier posts (here) and (here).
In brief, the process is as follows: To get started with AWS create an account or sign in to the AWS EC2 dashboard. Once on the dashboard set up an environment in which to host the virtual server.
The components of this environment are: a ssh key-pair, a firewall, a static IP, and a domain name.
With the hosting environment in place, select an instance (AMI, type and disk size), then generate and launch the server.
Once the server is available, connect via ssh, and login.
The only software necessary to install at this point is docker (assuming it wasn’t installed in the server setup process). Install docker with the following commands:
sudo snap install docker.ioNote: snap is a package management system pre-installed in Ubuntu servers. Not to be confused with the apt package management system.
Once the host is set up and docker is installed, we’ll have accomplished items 1, 2, and 3 from our hosting list above. i.e. a customized virtual server wtih a static IP address, a unique domain name and firewall in place.
3 Configure
To configure the web server and containerize our app we need to add three files to the repo, to go along with our Shiny app. We’ll also need a landing page for our web site.
We’ll use Gitlab as an intermediate repository between our workstation and the EC2 server in an indirect route to create and place the necessary files on the server. This approach will allow us to do all our continuing development on our local workstation and have the web app be automatically continually undated. We’ll create the configuration files we need on our workstation and push them to Gitlab and from there they can be accessed from our server.
These three configuation files are:
3.1 Docker
 Photo by Ian Taylor on Unsplash
We’ll use docker to access R and Shiny, and docker-compose to access Caddy, our webserver. The first file is the dockerfile. Here is our minimal dockerfile located in the Shiny development directory:
show the Dockerfile code
FROM rocker/shiny:4.2.0
RUN rm -rf /srv/shiny-server
COPY /power1_shiny/* /srv/shiny-server/
USER shiny
CMD ["/usr/bin/shiny-server"]
This configuration file instructs Docker to build a container based on a Rocker/Shiny image (constructed as a ubuntu image with R and Shiny installed), then copy the power1_shiny/app.R code into the container and finally launch Shiny on (default) port 3838.
power1_shiny/app.R code in the default location /srv/shiny-server so we only need to start the Shiny server and it will find the shiny programStart by building and pushing the image to the gitlab container registry.
# login to gitlab

cat gitlab_access_token | docker login \
registry.gitlab.com -u rgt47 --password-stdin

docker build -t \
registry.gitlab.com/rgt47/power1_app/power1_image:v1.0 \
        --platform linux/x86_64 .
docker push \
registry.gitlab.com/rgt47/power1_app/power1_image:v1.0
3.2 Web-server
One of the most challenging parts of setting up a standalone server is installling and configuring the web server this is because we need our web server to perform several functions” that is 1) Provide a method for receiving and processing packets from the internet 2) Restrict access to https protocol packets. 3) host web-certificates, 4) provide authentication, and 5) forward 443 packets to 3838.
A Caddy web server configuration file (default name Caddyfile)
We’ll use Caddy as our web server. Caddy is an open-source tool that has the very useful feature of automating the acquisition and installing of an SSL certificate. (An SSL cert is required by most browsers to use the encrypted communication protocol https.)
We use the caddy configuration file to specify three critical things.
- the site domain name.
- the ‘reverse proxy’ map that redirects requests to port 443 (ssl port) to port 3838 (Shiny port).
- add login credentials for all users (e.g. bob/vanilla47):
Our barebones Caddyfile looks like this:
Show the Caddyfile code
# use caddy auth tool to generate a password via the `bcrypt` algorithm.
# > caddy hash-password --plaintext hiccup

rgtlab.org {
basicauth /power1/* {
    Bob $2a$14$Zkx19XLiW6VYouLHR5NmfOFU0z2GTNmpkT/5qqR7hx4IjWJPDhjvG
}
    root * /srv
    handle_path /power1/* {
        reverse_proxy power1:3838
    }
    file_server
}
We can accomplish what we need for items 4, 5, and 7 through the Caddyfile.
Note:
- rgtlab.org is our domain name
handle_pathmaps all https requests to port 3838 where Shiny is listening.
Providing our servers domain name, rgtlab.org is sufficient to initiate an exchange with the letsencrypt service to generate an SSL certificate.
3.3 Docker Compose
And a third file is a config file for Docker Compose. Docker Compose is a Docker module that provides a framework for running multi-container applications. This docker compose YAML file instructs Docker to containerize our Shiny app, pull a caddy webserver image from Docker Hub and create a local network for the two containers to communicate in.
A Docker-compose configuration file (default name docker-compose.yml).
The docker-compose.yml file:
docker-compose.yml. Show the code
version: "3.7"

services:
  power1:
    image: registry.gitlab.com/rgt47/power1_app/power1_image:v1.0
    restart: unless-stopped
    expose:
      - "3838"
  caddy:
    image: caddy:2.6.4-alpine
    restart: always
    ports:
      - "443:443"
    volumes:
      - $PWD/Caddyfile:/etc/caddy/Caddyfile
      - $PWD/site:/srv
      - caddy_data:/data
      - caddy_config:/config
    depends_on:
      - power1
    environment:
      - HOST="rgtlab.org"
      - EMAIL="rgthomas@ucsd.edu"
volumes:
  caddy_data:
  caddy_config:
3.4 Landing Page
Lastly, we need an html file, index.html in a subdirectory named site that provides the landing page for our server.
index.html. Show the code
<!DOCTYPE html>
<html>
  <head>
    <meta charset="utf-8">
    <meta http-equiv="X-UA-Compatible" content="IE=edge">
    <meta name="viewport" content="width=device-width, initial-scale=1">
    <title>Power Calculators</title>
    <link rel="stylesheet" href="https://unpkg.com/bulma@0.9.0/css/bulma.min.css" />
  </head>
  <body>
    <div id="app">
      <section class="hero is-small">
        <div class="hero-body">
          <div class="container has-text-centered">
            <h1 class="title">RGT Lab Power Calculators</h1>
          </div>
        </div>
      </section>
            <hr>

            <div class="columns">
              <div class="column is-4 is-offset-1">
      <img src="https://github.com/rgt47/power0/blob/master/power1.png?raw=true"
        width="200" height="250"  ”float: left; padding: 3px 3px 0px 3px;” >
              </div>
              <div class="column is-6">
                <h1 class="title"> Power1 App </h1>
                <p> Power for two-sample t-test </p>
                <br>
                <a href="./rebecca/" class="button is-info">Go to app</a>
              </div>
            </div>

    </div>
  </body>
</html>
At this point our power1_app repo looks like this:
.
├── Caddyfile
├── Dockerfile
├── docker-compose.yml
└── site
    └── index.html
4 Gitlab
Push the new content to gitlab.
git pushLogin to gitlab and issue a personal access token. Save it as gitlab_access_token in the power1_app directory.
Next login to the virtual server and clone the repo from gitlab.
ssh rgtlab.org
cat gitlab_access_token | \
  docker login registry.gitlab.com -u rgt47 --password-stdin
git clone https://gitlab.com/rgt47/power1_app.git
Lastly, cd into power1_app directory and run
docker compose up -dand you’re good to go! The power1_shiny app is available at:
https://rgtlab.org/5 Appendices
5.1 Tip 1. Docker on M1 macbook.
To get docker functioning properly with rocker images on M1 Mac desktop use --platform option.
docker build -t power1_shiny --platform linux/x86_64 .
docker run -d -p 80:3838 --platform linux/x86_64 power1_shiny
5.2 Tip 2 add user to docker group on server.
Add ubuntu to the docker group to allow docker to run without sudo.
sudo usermod -aG docker ${USER}5.3 Tip 3 ssh config file.
For convenience, construct a config file in ~/.ssh as:
Host rgtlab.org
HostName 13.57.139.31 # static IP
User ubuntu # default user on ubuntu server
Port 22  # the default port ssh uses
IdentityFile ~/.ssh/power1_app.pem
then you can ssh into the new server with
sh> ssh rgtlab.org6 References
7 APPENDIX
2023-12-02

workflow. steps to go from
a) have an idea for a shiny app to help julia
to
b) a secure app available at https://rgtlab.org/julia_stats

1. log into gitlab to set up the private holding repositories:
rgt47/julia_data and rgt47/julia_images

################################################# in gitlab

-   click on `New project` in upper right corner. Then choose "Create Blank
  Project".
Then in `repository name` field enter ` julia_data`.
-   leave `deployment target` empty.
-   make the repo private,
-   Click `Create project` blue button at the bottom of the page
  to create the repo.

 repeat for a second project named julia_images.
make project public


create a personal access token as follows:

left sidebar click avatar.
edit profile
  access tokens
  click "add new token"
    name: julia_prj
    expiration date: one month 9/28/24
    scope: api
copy token to clipboard
looks something like this:
glpat-hUKXsZKkhVAb4CT7hTZj


back on laptop
################################################# on laptop
git clone both new directories to ~/sbx
git clone https://gitlab.com/rgt47/julia_data.git
git clone https://gitlab.com/rgt47/julia_images.git

cd julia_data

# create gitlab personal token file.
cat > gitlab_token_julia
glpat-hUKXsZKkhVAb4CT7hTZj
^D

mkdir shiny_app
mkdir website
cd shiny_app
develop shiny code (app.R) in shiny_app directory.
run code to validate.
R -e "library(shiny); runApp('app.R', launch=T)"

cd back up to repo root
cd ~/sbx/julia_data

create dockerfile :

# Dockerfile
FROM rocker/shiny:4.2.0
RUN rm -rf /srv/shiny-server
COPY /shiny_app/* /srv/shiny-server/
USER shiny
CMD ["/usr/bin/shiny-server"]

run docker build

docker build -t registry.gitlab.com/rgt47/julia_data/shiny_image:v1.0 --platform linux/x86_64 .

push image to gitlab
# login to gitlab
cat gitlab_token | docker login registry.gitlab.com -u rgt47 --password-stdin

docker push registry.gitlab.com/rgt47/julia_data/shiny_image:v1.0

create Caddyfile, docker-compose.yml, website/index.html
(see end of this section for examples)
# push julia_data content to github
git add .
git commit -m "commit support files for Shiny app."
git push


spin-up server on aws rgtlab.org
need keypair, security group, and instance (other parameters known:
vpc id, subnet id, ami id, storage size, static ip
*** make sure static IP is available and domain name and IP are associated
before beginning instance install
> ~/bin/aws/aws_create_keypair.sh -k julia_app
key_pair_name is julia_app
> ~/bin/aws/aws_create_security_group.sh -s julia_app
error in command line parsing. Expect options n and p
> ~/bin/aws/aws_create_security_group.sh -n julia_app -p 22 -p 443
sg group name = julia_app
security group ID = sg-008cace70d32f6267
> vz (vim .zshrc)
> #update sg id and project name in .zshrc and source
> sz (source .zshrc)
> ~/bin/aws/aws_create_instance.sh -p julia_app
i-06c9b50e6c6e03874
should be only one instance id. if more than one, check aws console for multiple
instances with same prj name
wait 15 seconds for instance to generate and then associate static IP

check ~/.ssh/config to be sure it has correct keypair name and IP
address.

# check that domain name, hostname, and secret key are correct
Host rgtlab.org
    HostName 13.56.101.209
    StrictHostKeyChecking no
    User ubuntu
    Port 22
    IdentityFile ~/.ssh/julia_app.pem

   should be able to log in as
   > ssh rgtlab.org

scp files to rgtlab for
gitlab access
> scp gitlab_token rgtlab.org:~

login to rgtlab.org
check aws_start_up code worked
cat /var/log/cloud-init-output.log
clone the code directory from gitlab

git clone https://gitlab.com/rgt47/julia_data.git
login for docker

:~/julia_data$ docker login registry.gitlab.com -u rgt47 -p glpat-hUKXsZKkhVAb4CT7hTZj

registry.gitlab.com/rgt47/julia_data/shiny_image:v1.0
docker compose stop
docker compose rm -f
docker compose pull
docker compose up -d


~/master-repo (main ✘)✖✹ ᐅ cat Caddyfile

rgtlab.org {
basicauth /julia/* {
    Bob $2a$14$Zkx19XLiW6VYouLHR5NmfOFU0z2GTNmpkT/5qqR7hx4IjWJPDhjvG
}

    root * /srv
    handle_path /julia/* {
        reverse_proxy julia:3838
    }
    file_server
}

> cat docker-compose.yml


version: "3.7"

services:
  watchtower:
    container_name: watchtower
    restart: always
    environment:
      WATCHTOWER_POLL_INTERVAL: 3600
      TZ: America/Los_Angeles
      WATCHTOWER_CLEANUP: "true"
      WATCHTOWER_DEBUG: "true"
    image: containrrr/watchtower
    volumes:
      - /var/run/docker.sock:/var/run/docker.sock
      - /home/ubuntu/.docker/config.json:/config.json
  julia:
    image: registry.gitlab.com/rgt47/julia_data/shiny_image:v1.0
    restart: unless-stopped
    ports:
      - "9000:3838"
  caddy:
    image: caddy:2.6.4-alpine
    ports:
      - "80:80"
      - "443:443"
    volumes:
      - $PWD/Caddyfile:/etc/caddy/Caddyfile
      - $PWD/website:/srv
      - caddy_data:/data
volumes:
    caddy_data:

~/master-repo (main ✘)✖✹ ᐅ cat site/index.html

<!DOCTYPE html>
<html>
  <head>
    <meta charset="utf-8">
    <meta http-equiv="X-UA-Compatible" content="IE=edge">
    <meta name="viewport" content="width=device-width, initial-scale=1">
    <title>Power Calculators</title>
    <link rel="stylesheet" href="https://unpkg.com/bulma@0.9.0/css/bulma.min.css" />
  </head>
  <body>
    <div id="app">
      <section class="hero is-small">
        <div class="hero-body">
          <div class="container has-text-centered">
            <h1 class="title">RGT Lab Power Calculators</h1>
          </div>
        </div>
      </section>
            <hr>

            <div class="columns">
              <div class="column is-4 is-offset-1">
      <img src="https://github.com/rgt47/power0/blob/master/power1.png?raw=true"
        width="200" height="250"  ”float: left; padding: 3px 3px 0px 3px;” >
              </div>
              <div class="column is-6">
                <h1 class="title"> Power1 App </h1>
                <p> Power for two-sample t-test </p>
                <br>
                <a href="./julia/" class="button is-info">Go to app</a>
              </div>
            </div>


    </div>
  </body>
</html>
7.1 Prerequisites
In development
7.2 Step-by-Step Implementation
In development
7.3 Key Takeaways
In development
7.4 Further Reading
In development
Reuse
Citation
@online{(ryy)_glenn_thomas2025,
  author = {(Ryy) Glenn Thomas, Ronald},
  title = {},
  date = {2025-07-01},
  url = {https://focusonr.org/posts/dockerize_compose/},
  langid = {en}
}