Securely Deploying Your Shiny App Online: A Step-by-Step Guide
 Photo by Nathan Waters on Unsplash
1 Introduction
This guide demonstrates how to deploy a Shiny application from your local workstation to a secure web environment. We’ll use a stack of open-source technologies including Linux, R, Shiny, Docker, and Caddy, deployed on AWS EC2. While we focus on AWS here, the principles apply to other cloud providers like Hetzner, which we’ll cover in future posts.
2 Prerequisites
Before beginning this tutorial, you’ll need:
- A working Shiny application on your local machine
- An AWS account with permissions to create EC2 instances
- Basic familiarity with the Linux command line
- Git (optional, for version control)
3 The Example Application
Let’s start with a simple but practical example: hosting a shiny web application that provides a power calculator for two-sample t-tests. While straightforward, this application demonstrates all the key deployment concepts.
Here is the code for the Shiny app (The app is intentionally minimal, using only base R functions, with a minimum of reactive widgets and layout commands.):
Power Calculator Shiny App Code (power1_shiny/app.R)
ui <- fluidPage(
  titlePanel("Power Calculator for Two Group Parallel Designs"),
  sliderInput("N", "Total Sample Size:", min = 0, max = 300, value = 100),
  plotOutput("plot"),
  verbatimTextOutput("eff"))

server <- function(input, output, session) {
  delta = seq(0, 1.5,.05)
  pow = reactive(sapply(delta, function(x) power.t.test(input$N, d=x)$power ))
  eff =  renderText(power.t.test(input$N, power=.8)$d)
  output$plot <- renderPlot({
    plot(delta, pow(), cex=1.5, ylab="power")
    abline(h = .8,  col = "red", lwd =2.5, lty = 4)
    abline(v = eff(), col = "blue",lwd =2.5, lty = 4)})
  output$eff <- renderText(
    paste0("Std. effect detectable with power 80% = ", eff()) )
}
shinyApp(ui, server)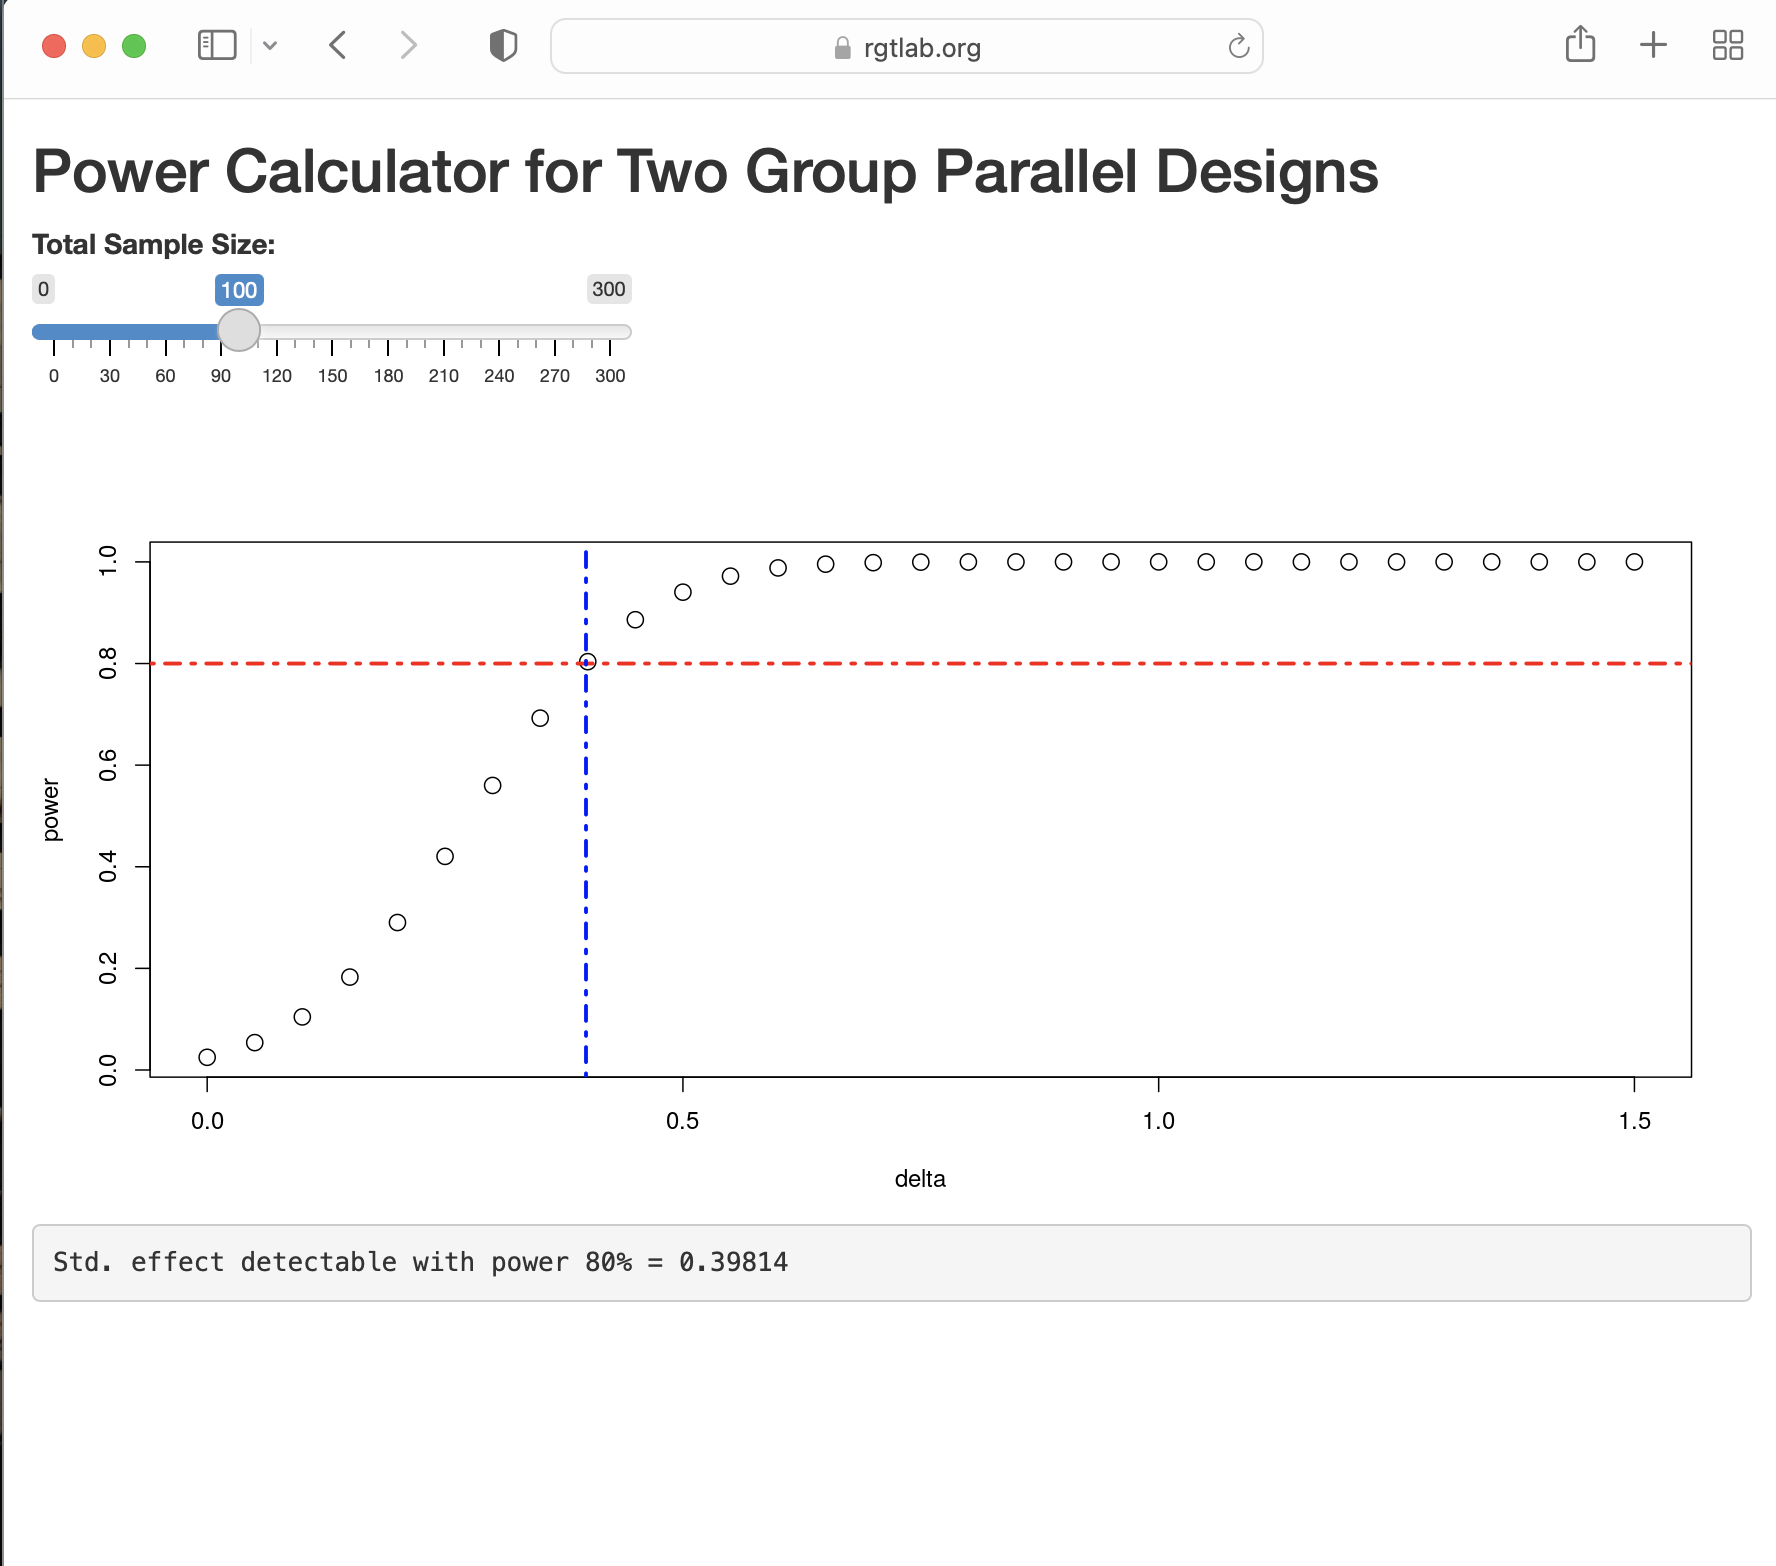
4 Step-by-Step Implementation
4.1 Deployment Checklist
As an overview, to host our Shiny app securely online, we need to:
- Obtain a static IP address
- Register a domain name
- Configure a firewall
- Set up the virtual server
- Install and configure a web server
- Implement SSL encryption
- Set up user authentication
- Configure reverse proxy routing
While this might seem complex, we’ll break it down into manageable steps.
Detailed instructions for setting up a virtual server (items 1 through 4 above) on EC2 both through the EC2 console and the command line interface can be found: here and here
4.2 Step 1: Server Setup
First, we’ll prepare our AWS EC2 environment: In the course of setting up your server, you’ll need to: 1. Create or access your AWS account 2. Generate SSH key-pair, named for example, power1_app.pem 3. Configure firewall settings, allowing SSH (port 22), HTTP (port 80) traffic and HTTPS (port 443) traffic. 4. Obtain static IP, e.g., 13.57.139.31 5. Register domain name, e.g. rgtlab.org 6. Launch Ubuntu instance (t2-micro is sufficient)
4.3 Step 2: Installing Required Software
connect to your server via SSH:
ssh -i "~/.ssh/power1_app.pem" ubuntu@rgtlab.orgOn your server, install Docker and Caddy (a modern web server with automatic HTTPS) using the following commands.
sudo apt update
sudo apt install docker.io -y
sudo apt install -y curl debian-keyring debian-archive-keyring apt-transport-https
curl -1sLf 'https://dl.cloudsmith.io/public/caddy/stable/gpg.key' | \
sudo gpg --dearmor -o /usr/share/keyrings/caddy-stable-archive-keyring.gpg
curl -1sLf 'https://dl.cloudsmith.io/public/caddy/stable/debian.deb.txt' | \
sudo tee /etc/apt/sources.list.d/caddy-stable.list
sudo apt update
sudo apt install caddy -y
4.4 Step 3: Containerizing the Application
Create a Dockerfile in your app directory:
Dockerfile Configuration
FROM rocker/shiny:4.2.0
RUN rm -rf /srv/shiny-server
COPY /power1_shiny/* /srv/shiny-server/
USER shiny
CMD ["/usr/bin/shiny-server"]
4.5 Step 4: Configuring the Web Server
Create a Caddyfile:
Caddy Server Configuration
rgtlab.org {
    basicauth * /power1_shiny/* {
        bob $2a$14$pYWd5O7JqNeGLS4m4CKkzemM2pq5ezn9bcTDowofZTl5wRVl8NTJm
    }
    root * /var/www/html
    handle_path /power1_shiny/* {
            reverse_proxy 0.0.0.0:3838
    }
    file_server
}
Create an index.html:
Landing Page HTML
<!DOCTYPE html>
<html>
  <body>
    <h1>Power1 app</h1>
    <ul>
      <li><a href="./power1_shiny/">Power1 app</a></li>
    </ul>
  </body>
</html>
4.6 Step 5: Deployment
- Copy files to server:
scp -r ~/prj/power1_app/ ubuntu@rgtlab.org:~- Build and run Docker container:
docker build -t power1_image .
docker run -d --name=power1_shiny -p 3838:3838 --restart=always power1_image- Configure Caddy:
sudo cp ./Caddyfile /etc/caddy/
cp ./index.html /var/www/html/
sudo systemctl reload caddy
Your app should now be available at https://rgtlab.org!
5 Advanced Tips
For easier SSH access, create a ~/.ssh/config file:
Host rgtlab.org
HostName 13.57.139.31
StrictHostKeyChecking no
User ubuntu
Port 22
IdentityFile ~/.ssh/power1_app.pem
This enables simple SSH access:
ssh rgtlab.org6 Key Takeaways
- Docker containers provide isolation and reproducibility for your Shiny applications
- Caddy web server automatically handles SSL certificates and security
- Basic authentication provides a simple access control mechanism
- AWS EC2 offers a reliable platform for hosting web applications
- The entire deployment can be automated for continuous delivery workflows
7 Further Reading
8 Step-by-Step Implementation
In development
9 Key Takeaways
In development
10 Further Reading
In development